
Developing tests for web based front end applications can be a time consuming task – once you have identified the test cases you wish to automate, you have to examine the UI components of the application and determine the best locators to use for each element.
Once the initial prototype tests have been written it is good practice to refactor them to move the selectors and any methods to perform common actions into a common set of classes to make the tests easier to maintain and extend. A common pattern for implementing this is the Page Object Model.
Introducing Wisard
Wisard – (Web Internal Structure Action RecorDer), is a WebDriver based tool for creating Selenium tests. It examines an open page and displays a list of the web elements, and allows you to quickly develop a basic test as a series of Java (or Javascript) statements.
See this link for more information, and instructions on how to compile from source : http://objectivetester.github.io/wisard/
Selenium uses externally supplied drivers to control browsers – for the purposes of this exercise, its easiest to use Chrome browser (although Wisard does support others). Thus you will need to download (and extract) the Chromedriver binary corresponding to the version of Chrome you are using from: https://chromedriver.chromium.org/downloads
And then configure Wisard to use Chrome with the driver by setting the browser and entering the path to the executable in the settings page. Additionally, configure Wisard to generate JUnit5 output.
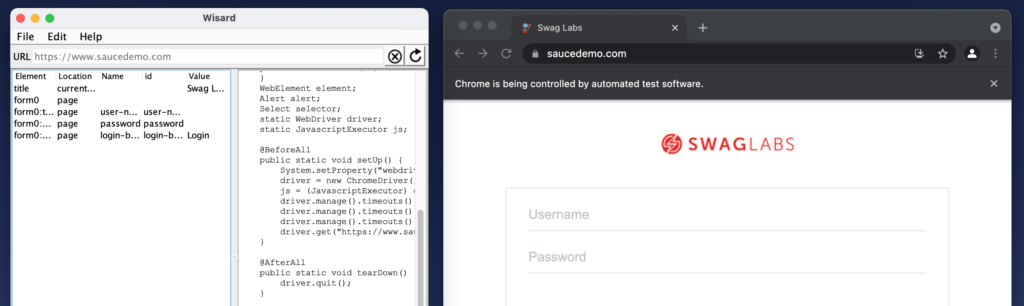
Starting a session
If it’s not already set by default, enter https://www.saucedemo.com into the URL field and click the ‘Examine Icon’
Once the page loads, your desktop will have Wisard and Chrome running, with Wisard showing the page elements and Chrome displaying the page
Let’s get started – with a failure case. Using Wisard to send a ‘click’ event to the Login button without entering a valid username & password causes an error to be displayed. However, if you click ‘Refresh’ in Wisard it will not find the element containing the error.
Using the Inspect tool, drill down to find the web element containing the error:
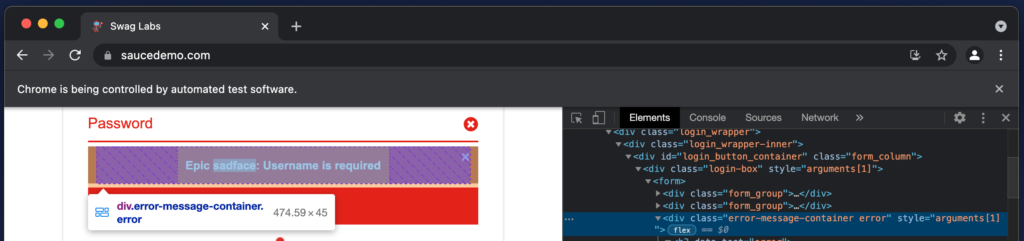
Then go to the setting page of Wisard and add class="error-message-container error" to the ‘DIV tag selectors’ field and refresh. Wisard will now find the error element, so you can create an assertion on it:
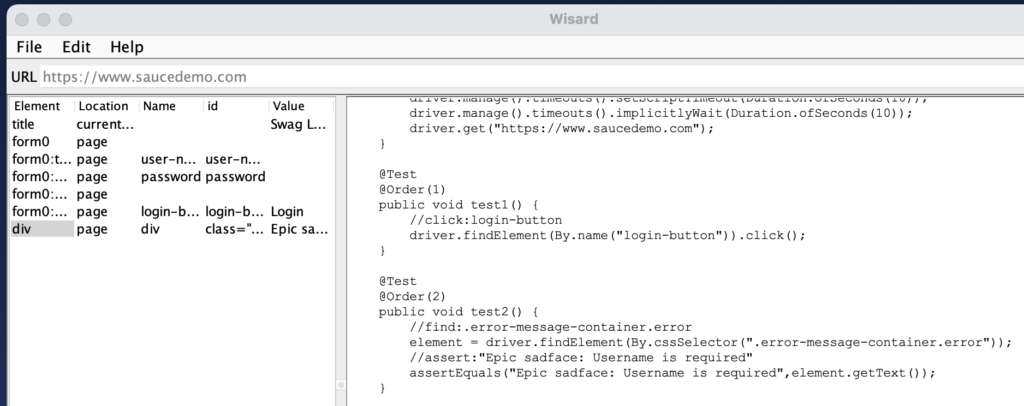
Obviously, the generated code will need some refactoring but first we can move on to record the actions to perform some positive tests. As this is an e-commerce site, an obvious test would be to actually log in, and then as a bare minimum add an item to the basket and then complete the purchase.
First up, let’s log in and assert that some of the inventory page elements are present and then logout.
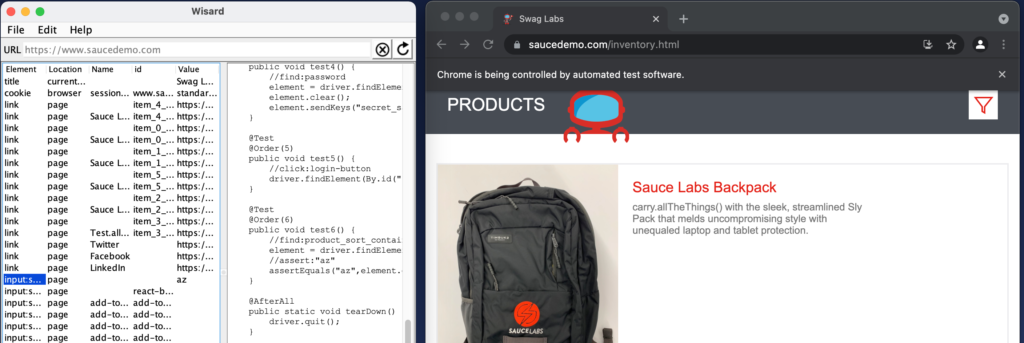
Then login (again), assert on an item image, add an item to the basket and then complete the checkout process (asserting on any relevant messages like total price, etc.)
This will require additional DIV tag selectors being added to find some of the elements.
The recorded tests
Clone the repository from https://github.com/ObjectiveTester/AllThingsTesting.com-examples.git and open the WisardRecordedTest directory in an IDE.
The file RecordedTest.java is the raw output from Wisard after recording all steps (and although quite messy, will successfully run as a series of tests)
The file RefactoredTest.java has been cleaned up (a lot, and also a few assertions changed), and a @BeforeEach method has been added to reset the browser in case of any failed tests and the tests have been separated into three:
- Login failure case
- Login & Logout test
- Single item checkout
Each test runs individually, and does not rely on any other or the execution order (so those directives have also been removed)
The tests can be executed from an IDE or with:mvn clean test -Dtest=RecordedTest
mvn clean test -Dtest=RefactoredTest
However, there is a lot of repetition in the code – and if an element were to change in the implementation, it would need to be updated in multiple places even across just these three tests.
Introducing Page Objects
The Page Object pattern is intended to structure tests to minimise maintenance. All the elements on a given page are collected into a class file with a series of getter, setter and doing methods, and if the selectors change they need only be updated in one place.
Getting started
Start by creating a class file for each page – in this example, this is quite simple as there are three pages – the Login, Inventory and Cart pages
For the elements on each page (e.g. the Login page), create private fields for the selectors (as a By type), a constructor that takes a WebDriver object as an argument, and some getters to return elements, and methods to interact with the elements to implement the tests.
Rather than reproduce the whole class, here is a partial example:
private WebDriver driver;
private By usernameTextField = By.id("user-name");
private By passwordTextField = By.id("password");
private By loginButton = By.id("login-button");

public LoginPage(WebDriver driver) {
    this.driver = driver;
}

public void enterUserName(String username) {
    WebElement element = driver.findElement(usernameTextField);
    if (element.isDisplayed()) {
        element.clear();
        element.sendKeys(username);
    }
}

public void enterPassword(String password) {
        WebElement element = driver.findElement(passwordTextField);
        if (element.isDisplayed()) {
            element.clear();
            element.sendKeys(password);
        }
    }

public void clickLogin() {
    WebElement element = driver.findElement(loginButton);
    if (element.isDisplayed()) {
        element.click();
    }
}

public WebElement getLoginButton() {
    return driver.findElement(loginButton);
}
In this example, there are convenience methods to clear and set the username & password, and click the login button (if they are displayed), as well as a method to return the login button element. The full class contains additional fields and methods.
The login tests can then be moved to a separate class and the tests refactored to use the Login page class to get and interact with the elements. e.g.
//find:user-name
element = driver.findElement(By.id("user-name"));
element.clear();
element.sendKeys("standard_user");

//find:password
element = driver.findElement(By.id("password"));
element.clear();
element.sendKeys("secret_sauce");

//click:login-button
driver.findElement(By.id("login-button")).click();
Becomes:
loginPage.enterUserName("standard_user");
loginPage.enterPassword("secret_sauce");
loginPage.clickLogin();
Which is more readable, and easier to maintain.
Similarly, the other two pages have fields and methods necessary to perform the required tests, e.g.
private By inputFirstName = By.id("first-name");
private By inputLastName = By.id("last-name");
private By inputPostalCode = By.id("postal-code");
private By linkContinue = By.id("continue");
private By classSummaryTotal = By.className("summary_total_label");
.
.
public void fillShipping(String first, String last, String postcode) {
    WebElement element = driver.findElement(inputFirstName);
    element.clear();
    element.sendKeys(first);

    element = driver.findElement(inputLastName);
    element.clear();
    element.sendKeys(last);

    element = driver.findElement(inputPostalCode);
    element.clear();
    element.sendKeys(postcode);

    driver.findElement(linkContinue).click();
}

public String getTotalValue() {
    return driver.findElement(classSummaryTotal).getText();
}
Enabling the tests to be refactored to:
cartPage.fillShipping("John", "Smith", "90210");

assertEquals("Total: $32.39", cartPage.getTotalValue());
The tests have also been separated into two classes (a login and login failure test, and the purchase test). An additional base class has been added containing common methods, etc. which can then be inherited by the tests by using the ‘extends’ keyword.
The full code is in the repository from https://github.com/ObjectiveTester/AllThingsTesting.com-examples.git in the PageObjects directory.
The tests can be executed from an IDE or with:mvn clean test
Individual tests can be executed executed from the command line with:mvn clean test -Dtest=LoginTest
mvn clean test -Dtest=PurchaseTest
Running the tests on a different browser however would require the tests to be modified.
A future blog post will demonstrate how tests can be executed on different browsers both locally and remotely.